There is a famous saying that if a grain of sand is in a carburetor, it can stop the most potent motorbike engine. And many people have certified this statement to be true because all carburetors are designed to be dirt free.
So, you must ensure that your carburetor is always clean, though this is very tasking but necessary to keep your engine safe. To clean your carburetor, you will need an ultrasonic cleaner.
And in this article, you will learn all you need to know about ultrasonic cleaners and how to use them to clean a carburetor.
Benefits of Ultrasonic Cleaner for Carburetors
There are significant benefits to using the ultrasonic cleaner to clean your carburetor, and some have been highlighted below.
● Fast
The speed of ultrasonic cleaners differs from one product to another due to the difference in the frequencies they emit. The higher the frequency, the faster it cleans the carburetor. And, you can get to do other activities or essential tasks with the saved time the ultrasonic cleaner affords you.
● Thorough
The ultrasonic cleaner makes it easier and more thorough to clean engine parts. What is required of you is to place the engine parts into the cleaner, add the ultrasonic cleaning detergent and turn on the generator. And in no time, a thorough cleaning is done by removing large and small debris.
Also, the ultrasonic cleaning process reduces the possibility of wear and tear effect on the carburetor. And this is possible through the utilization of sound waves to initiate the scrubbing process without abrasion. And, since the carburetor is exposed to numerous chemicals, the ultrasonic cleaner ensures that all the chemicals are properly removed. So, you are sure of a thorough cleaning process that preserves your engine's lifespan.
Wide range of contaminant removal – since carburetors are prone to various chemicals and dirt, an ultrasonic carb cleaner offers a tremendous level of flexibility when it comes to stain removal.
How To Clean A Carburetor By An Ultrasonic Cleaner
Before you can carry out the cleaning process of your carburetor using an ultrasonic cleaner, you will need to know the suitable materials you need. You need to put materials in place to ensure that the cleaning is successful.
Preparation
In the preparation to clean your carburetor, you will need a few materials for the cleaning process. And these materials are as follows;
- Ultrasonic cleaner: The ultrasonic cleaner is divided into three sections; the generator, transducer, and tank or vessel.
- The ultrasonic generator supplies the power to the transducer by converting voltage and frequency into high magnitudes of about 2000V/40KHz from 240V/60Hz.
- The ultrasonic transducer receives power from the generator and converts it into sound waves. And it is this ultrasound that initiates the scrubbing process by creating cavitation in the fluid.
- The ultrasonic tank or vessel is the space where the cleaning process occurs. It contains water, detergent, a transducer, and engine parts.
- Water.
- Cleaning solution.
- Tools to dis-member the carburetor.
Step-by-step Guide
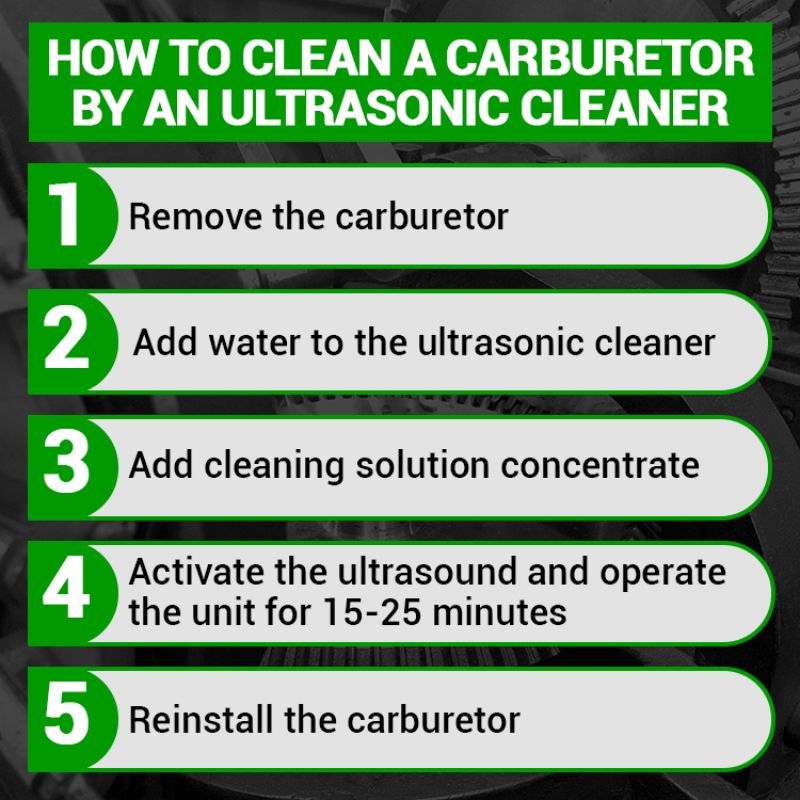
Step 1: Remove the Carburetor
Use a Philips screw to remove the two bolts, then pull out the fuel line with a plier. And remove the throttle cable by twisting the carb toward the sky.
Step 2: Add water to the ultrasonic cleaner
The water level should not exceed the recommended level. You can use a mix ratio of water to solution as 10:1 for mild contamination and 7:1 for heavy contamination or two-thirds of the tank as a minimum fill but half full for small cycles.
Step 3: Add cleaning solution concentrate
Select a good quality cleaning solution or you can choose to make your own solution. When adding the solution, check the data sheet for the chemical composition if it is suitable for the cleaning.
Step 4: Activate the ultrasound and operate the unit for 15-25 minutes (depends on the condition of the carburetor)
The cleaning time depends on the level of dirt on the carburetor. While it will take 15 minutes to clean a carburetor with mild contamination, it will require up to 25 minutes to clean a heavily contaminated one.
Step 5: Reinstall the Carburetor
The same way you dismembered the carburetor, refix it using the same working tools.
Tips to Maintain Ultrasonic Cleaning Solution and Cleaner
- Before draining the solution, ensure that the unit is unplugged. If the unit remains plugged, it can accidentally stimulate the heating elements, leading to overheating. And, you should know that when water is in contact with electricity, it can be fatal for you or anyone.
- After the cleaning process, drain out the detergent and occasionally clean the tank to remove the heavy gunk and dirt that fails to flush out. This debris usually settles at the bottom of the tank, occupying space and obstructing the ultrasonic waves. And when this happens, the cleaning process becomes less effective. When cleaning the tank, ensure you use a rag to wipe the bottom clean or clean cool water to rinse it.
- Another good maintenance tip is to change the filter regularly. This will help remove contaminants from the cleaning detergent, and the system ends up working faster and better.
- Please avoid using solvent-based detergents because they may react to the stainless tank surface. Any solvent with a flashpoint below 200˚F is not recommended as a detergent for ultrasonic cleaning. And solvents are very toxic and harmful to humans. Water-based detergents are better for ultrasonic cleaning.
- Wipe off loose, greasy, or heavy contaminants before placing the parts on the ultrasonic cleaner. This will reduce the dirt or gunk that remains at the bottom of the tank, thereby saving you the time to clean it up.
- Remove unwanted gas in the new detergent before starting the cleaning process. When the new solution is mixed, it contains some gas (trapped air). And this trapped air will make the cleaning process take longer because it will have to degas itself before cleaning the parts. To degas the solution, you need to raise the unit's temperature to the desired temperature and run the cleaner for 10 minutes without adding any parts.
- Note the average cleaning time to clean each part with a freshwater solution. And when you notice that it exceeds the average time, change the cleaning solution.
Conclusion
It is often said that time is money, which is true because everything requires your time. So, that's why people prefer any gadget that will save their time and give them convenience.
Cleaning your carburetor can be very tasking and time-consuming; that's why the ultrasonic cleaner is very sought-after equipment because it does a thorough cleaning in record time.
And this article has provided you with all the necessary information and tips you need to use an ultrasonic cleaner. All you need to do is get yours now!